FAQ  •  Register  •  Login
UKLockpickers.co.uk Lockpicking supplies such as Lockpicks, tools, and more! COMMANDOLOCK.COM Military grade padlock systems lockpickshop.com A source for lockpicking supplies such as lockpicks, locksmith tools, and more!

Exploring a Victor Cannonball Safe

<<

00247

User avatar

Familiar Face

Posts: 153

Joined: Mon Mar 16, 2015 11:04 pm

Location: Wisconsin

Post Wed Mar 18, 2015 10:25 am

Exploring a Victor Cannonball Safe

There were some requests for the story behind this cannonball safe so I will attempt to share the process of how I reworked this lovely little Victor. I say reworked vs restored to cut some slack for myself in case there are any Victor experts in the forum membership. While I tried to be as original as possible sometimes compromises come into play. It is hard to document what is truly correct especially when there were variations when the safes were made.

After seeing cannonball safes online I knew I had to have one. Finding it was not so easy. Yes, there were some on Ebay but they were always far away or priced ridiculously high. I missed out on a couple opportunities, usually a day late, sometimes a dollar short.

Patients finally paid off when on a Sunday evening this one popped up on Craigslist. It had been on for a couple days, I couldn't believe it was not sold yet especially at the $200 asking price. Needless to say I was on the phone immediately and was in Rochester, MN early the next morning. There she sat, her better days behind her but looking optimistic to a bright future.

Image

This is the smallest of the Victor cannonballs. I believe there were 5 models in all. The next step up is the same upper but the base is taller and it has a compartment in it with a combination lock on the door. I would have preferred that model but I will not complain. The others were of the same style but were larger overall, and much heavier. I estimate this one to be ~1800-2000 lbs. My Bobcat can lift it but my tractor can just get it off the ground enough to move it in the shop.

A quick story about loading it. I took my equipment trailer to pick up the safe. The seller had a small endloader with large pallet forks to load it. I intended to use chains to lift it as there were no worries about damaging paint. That plan changed when the guys helper suggested rolling it onto a steel plate on the forks of the endloader. It was a large sheet of heavy plate steel so it sounded like a good idea. Rolling the safe onto the steel was easy as he lined it up with the edge of the concrete apron in front of the building.

As the safe was lifted the steel bowed a little as the forks were about 4' apart. All seemed sturdy and I gave the seller the thumbs up to move and lift it to the trailer. I have to give the old guy credit, the endloader was old and worn out but he backed up, turned and lifted the safe with care. Careful to keep the forks level I used hand signals to guide him to the edge of the trailer. Gently the heavy load was lowered until the steel plate rested on the trailer's edge. The steel just touched, the forks were tiled a bit to assist me and the guys helper to roll the safe onto the trailer. With a gentle push it started roll... then all hell broke loose!

I hadn't noticed, but when the steel was rested on the trailer it was just the bowed portion of the steel. The forks were still a little higher. When the safe rolled quickly forward the wheels hit the wooden bed of the trailer as the steel sprung upward with the weight being removed. In a split second the safe flipped forward landing on it's backside! Thank goodness I and the helper were not in front of it. It happened so fast no one would have been able to get out of the way.

Fortunately, the safe was being rolled backwards. If it had landed on the door there would have been serious damage. It was determined that it was in the perfect hauling position and was chained down and I headed for home 150 miles away.

Image

Next I will get into the nitty gritty of the safes insides. This may take a while but I will add more as time permits. Stay tuned!
Last edited by 00247 on Tue Mar 24, 2015 1:18 pm, edited 1 time in total.
<<

rohare

Familiar Face

Posts: 34

Joined: Sat Sep 21, 2013 8:56 pm

Location: Los Angeles, CA

Post Wed Mar 18, 2015 12:04 pm

Re: Exploring a Victor Cannonball Safe

Wow, that's spectacular. I look forward to seeing how that project progressed.
<<

Doogs

User avatar

Contributor
Contributor

Posts: 494

Joined: Mon Mar 31, 2014 5:26 pm

Location: Gananoque, ON, Canada

Post Wed Mar 18, 2015 2:14 pm

Re: Exploring a Victor Cannonball Safe

Glad nobody got hurt! It would of been an unlucky start to your project. I can't wait to see the rest of the restoration pics.
The other, other, other, other Mike

(21:55:20) HAL 9001RC:: Heh heh uh heh uh heh uh uh heh PhoneMan said ass
<<

mastersmith

User avatar

Contributor
Contributor

Posts: 675

Joined: Wed May 25, 2011 4:16 pm

Location: Miami Township, Ohio

Post Wed Mar 18, 2015 3:24 pm

Re: Exploring a Victor Cannonball Safe

This is going to be an incredible story. I can't wait to hear your second one, I hear they get better as they go.....;) Welcome to the forum!
"All ye who come this art to see / to handle anything must cautious be...." Benjamin Franklin
<<

GWiens2001

User avatar

Lock-Goblin-Gordon
Lock-Goblin-Gordon

Posts: 3795

Joined: Thu Oct 25, 2012 9:05 pm

Location: Arizona, United States

Post Wed Mar 18, 2015 5:45 pm

Re: Exploring a Victor Cannonball Safe

The anticipation is killing me! More, more, more!!! :-)

Gordon
Just when you think you've learned it all, that is when you find you haven't learned anything yet.
<<

flywheel

User avatar

Active Member

Posts: 650

Joined: Tue Dec 31, 2013 2:08 pm

Location: USA

Post Wed Mar 18, 2015 8:05 pm

Re: Exploring a Victor Cannonball Safe

Sweet. Keep the pictures coming. :pimpmofo:
<<

GWiens2001

User avatar

Lock-Goblin-Gordon
Lock-Goblin-Gordon

Posts: 3795

Joined: Thu Oct 25, 2012 9:05 pm

Location: Arizona, United States

Post Wed Mar 18, 2015 8:17 pm

Re: Exploring a Victor Cannonball Safe

Just hope it does not have a glass relocker in it. Does the door open now?

Gordon
Just when you think you've learned it all, that is when you find you haven't learned anything yet.
<<

00247

User avatar

Familiar Face

Posts: 153

Joined: Mon Mar 16, 2015 11:04 pm

Location: Wisconsin

Post Wed Mar 18, 2015 10:57 pm

Re: Exploring a Victor Cannonball Safe

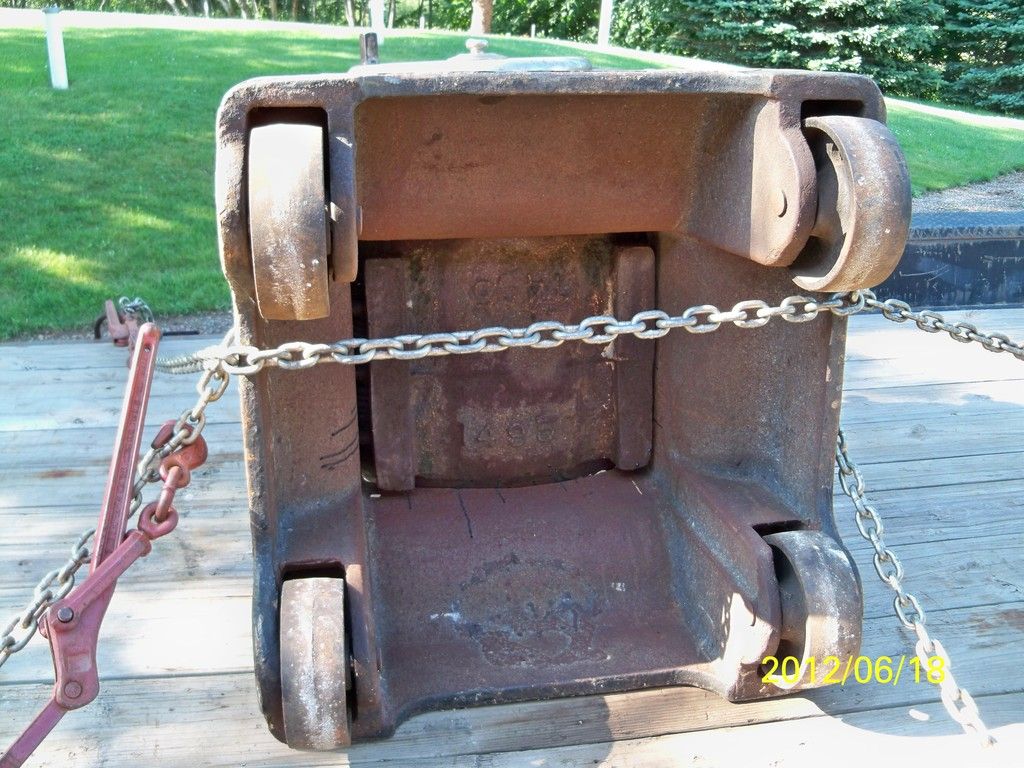
While the loading experience was a near miss it did give the opportunity to see the underneath of a cannonball safe. I don't think life will give any of you another chance to see how the top nests into the base. There are 6 flat head bolts that are countersunk into the cast iron base which screw into flanges cast on the manganese steel top.

Image

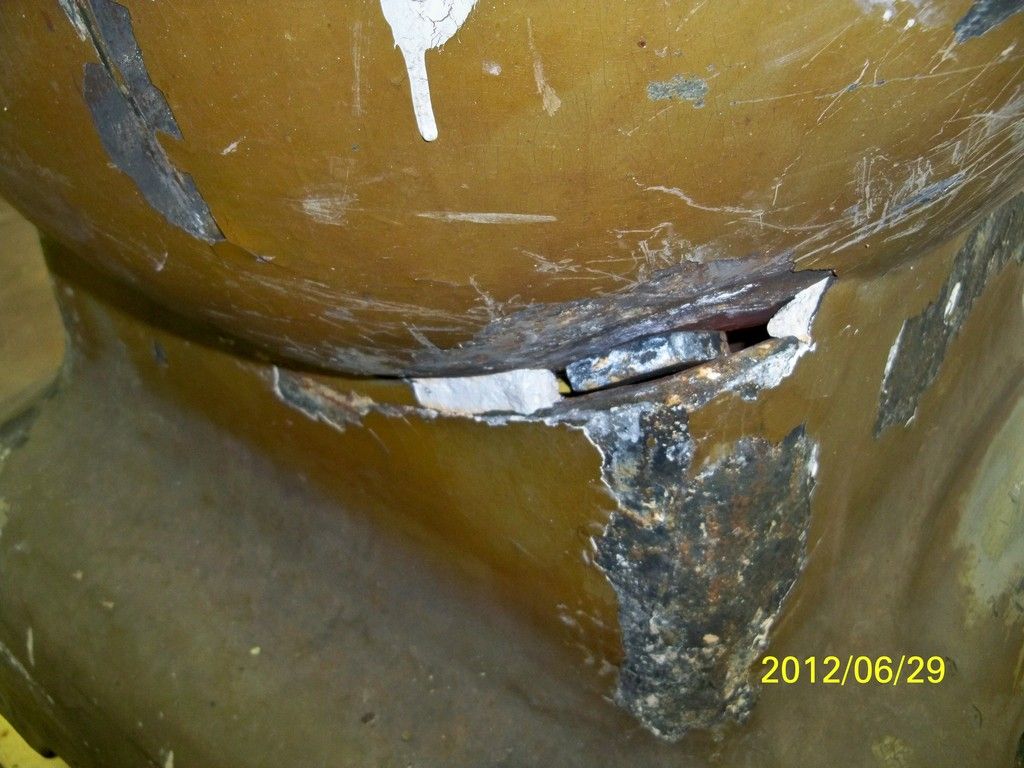
The fit is not all that great between the two pieces evidenced by this wedge in one corner. There was some type of caulk sealing the seam while the rest of the safe had a dark grey filler material throughout.

Image

This safe came out of the First State Bank in Dover Minnesota. The seller bought the bank building in the 60's and removed it from the building more recently when he sold it. It is a 1908 model and would normally not be identified to a year but for a certain quirk which ties it to circa 1908. The Victor cannonballs were built in 2 versions starting in 1905. The early style had a two piece door with fine threads. The machined door screws into a machined opening creating a wedged seal which makes the door opening impervious to nitro glycerin attacks. Surprisingly, the door design was changed to a one piece door with coarse threads after a door was successfully breached with explosives that split the door halves apart.

A patent was issued in 1908 for the new door design. This safe with it's early design door has the new patent listed on it's tag. There have been several early model safes documented that have the incorrect tag which have been deemed to have been built at the end of the early model run but for some reason received the new style tags.

Image

These pictures show how the door mounts in a C shaped cradle that is hinged to the body of the safe. The door pivots in the cradle in order to let it move into the opening squarely. There is a large crank that is used to turn the heavy door by way of a ring and pinion gear assembly. More on that later.

Image


Image

I bought this safe, door open, no combination. No worries I thought as I had bought a couple other traditional safes that way. It was easy to access the locks and retrieve the combinations. I assumed it would be the same here. Once I got home and took a closer look... not that simple. Next time we'll attack the door and take a look at the lock.

Image
It is time... stand up for a constitutional America. Without it, we have shed blood in vain.
<<

Oldfast

User avatar

OldddffAASSTT the Spin Master Extraordinaire and American Lock Slayer

Posts: 4412

Joined: Thu Mar 31, 2011 9:16 am

Location: Michigan

Post Thu Mar 19, 2015 8:03 am

Re: Exploring a Victor Cannonball Safe

Whew... very happy everyone still has both legs after the loading of it. Could have turned out much different!

I wanna thank you for taking the time to share all this. GREAT photos... and I love the facts/history you're including.

I love safes... but I have to admit... the locks on the safes is where it's at for me :) Look forward to the next episode!!
" Enjoy the journey AS MUCH as the destination."
<<

00247

User avatar

Familiar Face

Posts: 153

Joined: Mon Mar 16, 2015 11:04 pm

Location: Wisconsin

Post Thu Mar 19, 2015 10:53 am

Re: Exploring a Victor Cannonball Safe

This little Victor can be a formidable foe to a would be thief especially if the time lock is set. In that state there simply is not a practical way inside. Sure, today's plasma cutter would be effective but in the early 1900's the safes design would prevail. The first line of defense is the combination lock on the front of the door. It directly moves a bolt that slides into a gate on the pinion drive that is rotated by the crank.

Image

The lock is a S&G. I assume it is a generic model for the time? You guys are the experts here so I will defer to you.

Image

Forgoing manipulation, there is a weakness in the design that would probably never occur to the average thief. The combination lock can be overcome quite easily by simply removing the decorative finials at the door pivots, unscrew the door pivot bolts and move the door cradle aside, remove the door cover bolts, and pull off the cover which removes the lock altogether. All done in a matter of minutes with a monkey wrench and flat blade screwdriver. Easy, as long as you don't drop the 50# cover on your foot. Of course if the time lock is set... you just wasted your time.

Image

Under the steel cover is a ring and pinion gear setup. Note how the ring gear is bolted and wedged to the rotating assembly. All parts are a set bearing matched numbers stamped into them. Alignment marks set the timing of the gears.

Image

A problem was discovered inside. The long crank can put a large amount of torque against the gate washer on the pinion shaft. Perhaps a lot of incorrect combinations were dialed, who knows, but the pinion assembly was damaged, repaired, and was about to fail again. The gate washer is double keyed to the shaft. At one time the key ways failed. A cobbled repair was done by drilling out the key ways, inserting part of a bolt and then brazing the whole thing together. With the help of a sympathetic machinist the shaft was welded, turned, and new key ways cut. A new gate washer was machined and a missing bushing was made for the end of the shaft. Makes me wish I had become a machinist!

Image

Image


Next we'll go to the other side of the door and look at the time lock.
It is time... stand up for a constitutional America. Without it, we have shed blood in vain.
<<

Riyame

Keeper of the Bests / Supreme Overlord of Small Format Interchangeable Picking Nightmares

Posts: 2164

Joined: Sun Jul 24, 2011 11:16 am

Location: Canada

Post Thu Mar 19, 2015 12:26 pm

Re: Exploring a Victor Cannonball Safe

00247 wrote:The lock is a S&G. I assume it is a generic model for the time? You guys are the experts here so I will defer to you.
Next we'll go to the other side of the door and look at the time lock.


Awesome stuff. According to my resources I believe this is a Series 6840 Fire Proof - Hand Changing model with Dial # 6912. It has a Japanned iron case 4" x 2 7/8" x 1 1/4", 3 number combination and a sliding bolt with a 3/8" throw. But this is information from a 1927 catalog so it might be different than yours.
PhoneMan: I always knew I'd say something stupid and it would be someone's sig
macgng: i am an equal opportunity pervert
macgng: aww fuck thats goin in someone sig :-(

If life gives you melons, you might be dyslexic.
<<

00247

User avatar

Familiar Face

Posts: 153

Joined: Mon Mar 16, 2015 11:04 pm

Location: Wisconsin

Post Thu Mar 19, 2015 10:16 pm

Re: Exploring a Victor Cannonball Safe

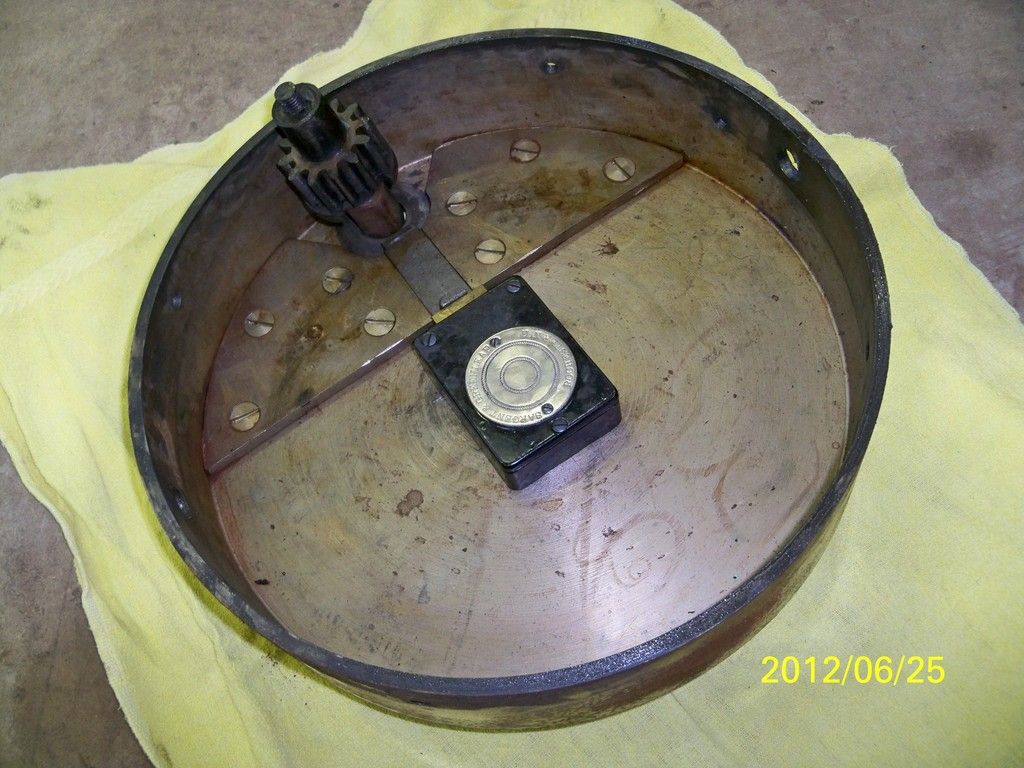
I will move on to the inside and take a look at the time lock. As an alert member noted it is a Bankers Dustproof 3 movement time lock that can be set up to 72 hours. Bankers Dustproof was a subsidiary of Victor and was started around 1906. It is the only time lock I have seen in Victor cannonballs. If you haven't already been there, take a look at Mark Frank's site http://www.my-time-machines.net to see fantastic time machines, time locks, and more information on these time locks if you are interested. Frank was especially helpful to me with gathering information on the door latch used on my time lock.


The inside of the door has a nickel plated back plate that covers the back of the door and fits around the time lock. It, like the front door, has a design turned into the finish. Most commonly called engine turning, it is also called damascening, jeweling, and other terms. Things were in a little better shape on the inside. I was pleased to find that the original carpet had survived.

Image

That is not to say that everything was perfect. The bolt heads for the rear cover were beat up from the door being rotated when not closed correctly. The time lock door also has a slight dent and some nicks because of the missing door latch. The door would flop open and closed when the door was rotated. Most bankers of this style have the door latch missing. The push button on the side of the door screws into the sliding latch piece and loosens over time. Because the time lock tilts down the button falls out and gets lost. Imagine my surprise when despite the downward angle, I discovered the return spring was still embedded in the push button hole. The time lock is nickle plated and has beautiful engraving on the cover. The clock movements are also works of art in their own right.

Image

Image

This is the linkage the connects the time lock to the inner door bolts that slide into notches in the door frame. There is a spring loaded button in the threads of the door that gets tripped and the spring in the time lock forces out the bolts. You can also see the bolts that hold the threads to the rest of the rotating inner door. This was made one piece in the updated model with the 1908 patent.

Image

Bodywork and paint is next.
Last edited by 00247 on Tue Mar 24, 2015 1:34 pm, edited 1 time in total.
It is time... stand up for a constitutional America. Without it, we have shed blood in vain.
<<

keymaster1053

Active Member

Posts: 433

Joined: Thu Dec 29, 2011 6:45 pm

Location: Boston, Mass.

Post Fri Mar 20, 2015 4:46 pm

Re: Exploring a Victor Cannonball Safe

I love threads like this!!! keeps you coming back for more! :D
(20:10:59) Blacky: oki
(20:18:08) MBI: Me working for the CIA is about as likely as you working in the Middle East.
(20:19:01) Riyame: lol
(20:19:05) Riyame: he is in dubai
(20:19:26) MBI rescinds his previous comment
<<

00247

User avatar

Familiar Face

Posts: 153

Joined: Mon Mar 16, 2015 11:04 pm

Location: Wisconsin

Post Mon Mar 23, 2015 10:49 am

Re: Exploring a Victor Cannonball Safe

Time was not kind to the outside of the Victor cannonball. It had also been repainted at some point. With carefully scraping the second coat of paint and studying pictures online of other Victors, the original paint scheme was determined. There were variances of design even when the safes were new. They usually received custom lettering and sometimes striping at the selling dealer for the customer. While I tried to stay true to the original design, I took some liberty and changed it up a bit. Most Victor cannonballs were painted a light green that has a subdued gold metalflake in it. I was able to expose good samples in several places to use for a reasonable match to a modern paint code.

Image

The round upper body of the safe is made of manganese steel. I wondered how in the world could they cast this beast. Once it was sandblasted some clues were exposed. Unfortunately, all of my pictures of this safe in it's naked glory have been lost in the digital world, so you will have to take my word for it. The ball of the safe is cast in two halves front and back. Being manganese steel they are nonmagnetic. The surface finish of the castings was very poor with little craters every where. This picture shows a few. You can also see some of the original green underneath the second coat of paint.

Image

I noticed spots that had a different color to the metal as well as a band around the center. All of the areas were magnetic so were a regular steel. I am not sure what process they used to join the two halves together or fill the defects as there were no tell tale signs of welding. Perhaps there is a metallurgy expert among our members. Here is a picture inside that shows the seam between the arrows. Notice, no grinding marks.

Image

The inner threads are a steel insert as are the threads on the door. The wedge portion of the door is manganese. This is where the change was made in the later models to a one piece door as the bolts for threaded piece proved to be a week link.

Image

The base of the safe is a nice quality cast iron piece although there was a lot of warping to the sides of the flat square base. Once the body was sandblasted and surface prepped it was coated with an epoxy primer to provide excellent adhesion to the surface and for the automotive body filler. It took over two gallons of filler to level and and perfect the shape. A large portion of that was sanded off in the process but it still took a lot of work and hours to get it ready for paint. A high build urethane primer was used next with block sanding between multiple coats. Again all my bodywork pictures were lost so I will have to jump to the final paint.

I chose to go with a single stage catalyzed acrylic enamel for a more vintage look. Some times the base/clears get to shiny and deep for old safes in my opinion. The paint flowed out almost perfect. A quick light wet sand and buff and it was ready to be lettered. In natural light the gold in the green comes out and looks stunning like in this picture just after painting.

Image

These pictures are a bit off due to the bright florescent lights in my shop and the fact that I took them with a tablet. I called in an old pinstriper to do traditional hand lettering. "Sprocket" is well known in the upper midwest and has connections all over the country. If BS was gold we would be a couple of rich guys. Speaking of gold... I would have loved to do the artwork in gold leaf but I already had my left nut invested in this thing and had to compromise. We tried artificial gold but it clashed with the gold in the green so we opted for a standard gold which shows kind of yellow in the pictures.

Image

Image

Notice the unique Briggs expanding bolt work safe in the back ground. Hopefully the next project.

Image

Image

I have painted since I was in high school both privately and on the job. No matter how good you get Murphy's law will always get you. Damn, if the hose didn't bump the paint as I was cleaning up and put a booger in it. The easiest way to overcome it was with a little fun.

Image

In the last segment I will cover all the shiny (and expensive) parts. Stay tuned.

Image
It is time... stand up for a constitutional America. Without it, we have shed blood in vain.
<<

l0ckcr4ck3r

User avatar

Familiar Face

Posts: 187

Joined: Wed May 22, 2013 2:01 am

Location: NC, US

Post Mon Mar 23, 2015 12:29 pm

Re: Exploring a Victor Cannonball Safe

Simply amazing work!
Next

Return to Safes, Strongboxes & Combination Locks

Who is online

Users browsing this forum: No registered users

Don't forget to visit our sponsors for all of your lockpicking needs!
Powered by phpBB © 2000, 2002, 2005, 2007 phpBB Grop
"CA Black" theme designed by stsoftware