 |
 |
 |
Exploring a Victor Cannonball Safe
21 posts
• Page 2 of 2 • 1, 2
![]() Mon Mar 23, 2015 9:26 pm
Mon Mar 23, 2015 9:26 pm
Re: Exploring a Victor Cannonball Safe
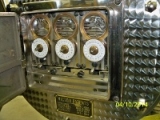
So I wanted a cannonball, once I got it home and studied it I wondered what I got myself into. Sure it needed severe bodywork and paint, that was the easy part for me. The mechanical repairs were simple enough, but man... what do I do about the shiny parts? Polishing them up helped but it was soon clear that in order to do it right all the plating would need to be redone. Compounding the problem is that the door cover and rear door plate were finished with an engine turning design in the nickle plating. If that wasn't enough, there was the issue of the male and female thread parts of the door. Raw steel, rusted raw steel, hmmmm.
The first problem is how to work with the door off the safe. It pushes 500 lbs so it is no easy task to work with it. I knew I would have to have complete control to install it back into the cradle so as not to scratch the paint. I modified an engine stand to raise with a hydraulic jack and with a second jack with a jig (not shown) could adjust the tilt to line up with mounting bolts.

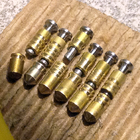
With the door apart I could start on the rusted threads. I was pleased to find that the steel used was of a very high quality. Despite the rusting there was very little pitting and it polished fairly quickly. 3M exl wheels saved the day. They are expensive so I watched Ebay regularly to find a supply of different grits. It took hours and hours to bring these pieces to a finish I was satisfied with.

As you can see I did manage to get the wedge portion of the door satisfactory too. That piece is manganese steel. Despite it's high nickle content it will rust and is subject to pitting. I struggled on how to get a finish that looked good but was also even. I started out with a belt sander and as I progressed to being more delicate everything I tried left it blotchy looking. Even the exl wheels left an uneven looking finish. Finally I thought of stoning it with an oil stone. Starting with a new coarse/fine stone and WD-40 and endeing up with a curved stone, a sore arm, and a heavy dose of never again! It took many hours to work out a nice even finish.
The plated parts were originally plated in nickle. I tossed around the idea of chrome for durability but nickle has a much warmer and authentic look to it. It also is much easier to turn the design into it. The plating estimates were through the roof and from previous experience I knew final prices are always higher. In order to save costs I prepared as many items as possible, stripping, filing, and polishing. The rear door bolts were beat up bad so I special ordered bolts off Ebay that are made one by one to a high crown vintage look.

I had to find a source for the engine turning design to be put in the nickle plating. It is almost a lost art so I searched for help on Craigslist. A few leads turned up but no one could do such a large item. I would have loved to try it but it wasn't worth building a jig for a one off project. Then there is the cost of plating. One bad turn could ruin the whole piece and require replating. I turned to the master, Eamonn Keogh of California. http://www.cs.ucr.edu/~eamonn/et/et.htm It was no time to cheap out now as the door cover is the most prominent feature of the safe. So off the 50# door cover and rear plate went to get jeweled by the master.


As you can see, it was all worth it. I'm so glad I stayed on track and followed through with all stages of the project. This was one of the most rewarding projects I have done though it did drag out a bit long. Several times I had to seek out the help of some experts to give me knowledge or direction. Thank god for the internet and web sites catering to special interests. I just joined this site and it has already helped me with a S&G combination issue. I thought I would give back a little by sharing the story of this great little Victor cannonball. I hope you enjoyed it.


The first problem is how to work with the door off the safe. It pushes 500 lbs so it is no easy task to work with it. I knew I would have to have complete control to install it back into the cradle so as not to scratch the paint. I modified an engine stand to raise with a hydraulic jack and with a second jack with a jig (not shown) could adjust the tilt to line up with mounting bolts.
With the door apart I could start on the rusted threads. I was pleased to find that the steel used was of a very high quality. Despite the rusting there was very little pitting and it polished fairly quickly. 3M exl wheels saved the day. They are expensive so I watched Ebay regularly to find a supply of different grits. It took hours and hours to bring these pieces to a finish I was satisfied with.
As you can see I did manage to get the wedge portion of the door satisfactory too. That piece is manganese steel. Despite it's high nickle content it will rust and is subject to pitting. I struggled on how to get a finish that looked good but was also even. I started out with a belt sander and as I progressed to being more delicate everything I tried left it blotchy looking. Even the exl wheels left an uneven looking finish. Finally I thought of stoning it with an oil stone. Starting with a new coarse/fine stone and WD-40 and endeing up with a curved stone, a sore arm, and a heavy dose of never again! It took many hours to work out a nice even finish.
The plated parts were originally plated in nickle. I tossed around the idea of chrome for durability but nickle has a much warmer and authentic look to it. It also is much easier to turn the design into it. The plating estimates were through the roof and from previous experience I knew final prices are always higher. In order to save costs I prepared as many items as possible, stripping, filing, and polishing. The rear door bolts were beat up bad so I special ordered bolts off Ebay that are made one by one to a high crown vintage look.
I had to find a source for the engine turning design to be put in the nickle plating. It is almost a lost art so I searched for help on Craigslist. A few leads turned up but no one could do such a large item. I would have loved to try it but it wasn't worth building a jig for a one off project. Then there is the cost of plating. One bad turn could ruin the whole piece and require replating. I turned to the master, Eamonn Keogh of California. http://www.cs.ucr.edu/~eamonn/et/et.htm It was no time to cheap out now as the door cover is the most prominent feature of the safe. So off the 50# door cover and rear plate went to get jeweled by the master.
As you can see, it was all worth it. I'm so glad I stayed on track and followed through with all stages of the project. This was one of the most rewarding projects I have done though it did drag out a bit long. Several times I had to seek out the help of some experts to give me knowledge or direction. Thank god for the internet and web sites catering to special interests. I just joined this site and it has already helped me with a S&G combination issue. I thought I would give back a little by sharing the story of this great little Victor cannonball. I hope you enjoyed it.
It is time... stand up for a constitutional America. Without it, we have shed blood in vain.
![]() Mon Mar 23, 2015 9:40 pm
Mon Mar 23, 2015 9:40 pm
Re: Exploring a Victor Cannonball Safe
Absolutely Stunning!!! That must be worth a fortune in gold now!  can you link to a video of you opening and/or closing it? I've never seen one in action before.
Jim.
Jim.
(20:10:59) Blacky: oki
(20:18:08) MBI: Me working for the CIA is about as likely as you working in the Middle East.
(20:19:01) Riyame: lol
(20:19:05) Riyame: he is in dubai
(20:19:26) MBI rescinds his previous comment
(20:18:08) MBI: Me working for the CIA is about as likely as you working in the Middle East.
(20:19:01) Riyame: lol
(20:19:05) Riyame: he is in dubai
(20:19:26) MBI rescinds his previous comment

![]() Mon Mar 23, 2015 9:49 pm
Mon Mar 23, 2015 9:49 pm
Re: Exploring a Victor Cannonball Safe
Amazing doesn't even begin to describe the transformation of that safe, and the look of the final product.
Thank you for posting your restoration process so we could all enjoy it here.
Thank you for posting your restoration process so we could all enjoy it here.
![]() Mon Mar 23, 2015 9:51 pm
Mon Mar 23, 2015 9:51 pm
Re: Exploring a Victor Cannonball Safe
That, my friend is an absolute work of art. Thank you for sharing your hard work and for saving that beauty.
![]() Mon Mar 23, 2015 10:05 pm
Mon Mar 23, 2015 10:05 pm
Re: Exploring a Victor Cannonball Safe
00247 wrote:
Jeez, is there any room left in the safe after you close the door?
21 posts
• Page 2 of 2 • 1, 2
Return to Safes, Strongboxes & Combination Locks
Who is online
Users browsing this forum: No registered users