Solomons disc detainer guide
These little locks are becoming increasingly popular and are pretty fun to pick. I am not focusing on high security disc detainers like Abloy, DOM Diamant or the ABUS Granit here. This is a guide for cheaper locks which use the same mechanism. Companies producing these locks include Am-tech, Blue Spot, Legion Tools, Silverline, and many other no-name brands. If you search for "high security padlock" on ebay, at least in the UK, the vast majority of the results are cheap disc detainers.
I've been getting into these lately and haven't seen any proper diagrams on how the mechanism works anywhere, apart from a fantastic animation I came across on youtube which I will link to shortly. I'm by no means an expert on these locks and the diagrams aren't perfect, but they will give you a pretty good idea of how everything works anyway.
When you insert the correct key into the lock, it will rotate 180° and the lock opens. To understand how everything works, first you need to look at the parts which make up the mechanism. It is fairly simple, comprising of three elements:
1. The discs
2. The shell
3. The sidebar
Each disc has a lip on it, which is what actually prevents plug rotation when we attempt to use an incorrect key or manipulate the discs. In the following image you will see 4 discs, each with cuts at various positions. The protrusion at the 2 o'clock position is the "lip".

To see how these lips interact with the sidebar, let's look at the mechanism as a whole and how it fits together.

You can now see the DISCS, the SHELL and the SIDEBAR. The discs and the sidebar are the moving components, and these are what we will focus on when picking. You can also see a gate cut out of the disc.
Before we move on, let's have a look at how the key opens the lock. These locks typically contain a series of between 6-8 discs, and each disc has a gate at a different position. When the key rotates to 90°, the gates in all the discs are aligned and create a channel for the sidebar to drop into. When this happens, there is nothing blocking the shearline and the discs are then free to rotate the rest of the way, which actuates the latch and retracts the ball bearings into their housing so the shackle can open.
If that doesn't make sense straight away, just keep reading. It'll become clear soon enough!
If you insert a blank key and rotate it, the discs will only rotate 90° and stop. This is why:
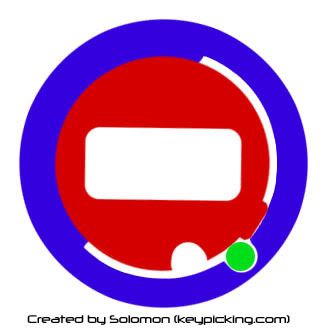
As you can see, none of the gates are aligned (actually, at least one will be... but more on that later) and the sidebar is blocking the discs from rotating past this point. Now you can see what those lips are for. Our goal is to align the gate in each disc with the sidebar so that it can drop into the channel, like so:
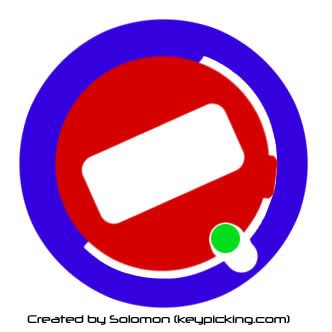
And free up the shearline so we can rotate the whole way:
Sounds complicated, so how do we pick it? Well, there is actually a binding order just like with any other lock. The reason these mechanisms can be picked is their necessity for "zero discs". You see, when you insert a key, at least one of those discs needs to act as a driver to keep the others in order. Without a zero disc, the gates wouldn't align at the correct position and it wouldn't open.
You don't need to worry too much about that though. All you need to know is that there is at least one of these discs in there, and it is the key to the whole picking process. The zero disc is almost always the very first disc, or the one at the back.
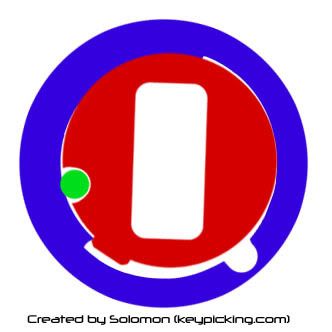
Here is what happens when we apply tension to a zero disc. This is the disc before rotating:
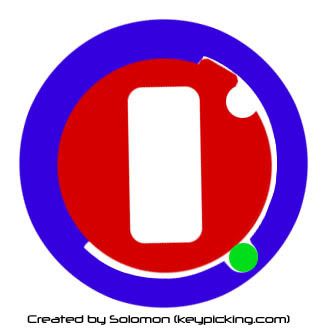
When we rotate it 90°, the gate aligns with the sidebar. The lip binds against the sidebar and prevents the disc from rotating any further. What happens now, is that the sidebar will try and enter the gate. Because of tolerance errors, just like any other lock, this causes the sidebar to bind against another disc somewhere:
So, all we do now is feel for the disc which is binding and rotate it until the gate lines up, then repeat the process until everything is aligned and the lock opens! When you apply tension to the zero disc, most of the others will feel loose and rotate freely, but the one which is binding will have a distinct dragging feeling as you rotate it. Once it loosens up, it's safe to assume that the gate is aligned and the sidebar is now binding against another disc.
TIPS & TRICKS!
- It is common practice to rotate all the discs 90° before picking. This is known as "zeroing the discs", and we do this to align all the zero cuts with the sidebar right off the bat, so there is less work to do. It's not necessary but it helps, and if you need to be tensioning a disc other than the first one, you'll find out much quicker if you zero the discs first.
- Heavy tension provides excellent feedback, but is not a good idea. If you must use heavy tension, do so only to locate binding discs and loosen up before actually rotating them. I've found with practice that the less tension you use, the better.
- Rotate discs slowly and pay attention to what you're feeling. It's a good idea to rotate them fully CCW and all the way back again because there can be zero discs in the middle of the pack.
- One disc at a time! You can't rush these locks. Haphazard twisting of the pick back and forth while moving it in and out of the lock won't get you anywhere.
- The more the lock tightens up, the closer it is to opening. You need to exercise gentle tension and careful movement with your pick as it tightens up.
- I've found that sometimes the front disc will seem to spin but there is a lot of friction and the lock won't open. The lock is almost open at this point, but if you get this kind of feedback it's a sign that you're using too much tension. Lighten it up and keep picking. When the gates are aligned everything will turn very smoothly and gently. Don't try to force it... when it's open, you'll know about it. There's no guesswork with these things.
I hope you guys enjoyed this, and anyone who wasn't sure how they worked before has had a eureka moment somewhere along the way. If my diagrams suck and make no sense, here is that animation I mentioned at the start instead.
I've been getting into these lately and haven't seen any proper diagrams on how the mechanism works anywhere, apart from a fantastic animation I came across on youtube which I will link to shortly. I'm by no means an expert on these locks and the diagrams aren't perfect, but they will give you a pretty good idea of how everything works anyway.
When you insert the correct key into the lock, it will rotate 180° and the lock opens. To understand how everything works, first you need to look at the parts which make up the mechanism. It is fairly simple, comprising of three elements:
1. The discs
2. The shell
3. The sidebar
Each disc has a lip on it, which is what actually prevents plug rotation when we attempt to use an incorrect key or manipulate the discs. In the following image you will see 4 discs, each with cuts at various positions. The protrusion at the 2 o'clock position is the "lip".
To see how these lips interact with the sidebar, let's look at the mechanism as a whole and how it fits together.
You can now see the DISCS, the SHELL and the SIDEBAR. The discs and the sidebar are the moving components, and these are what we will focus on when picking. You can also see a gate cut out of the disc.
Before we move on, let's have a look at how the key opens the lock. These locks typically contain a series of between 6-8 discs, and each disc has a gate at a different position. When the key rotates to 90°, the gates in all the discs are aligned and create a channel for the sidebar to drop into. When this happens, there is nothing blocking the shearline and the discs are then free to rotate the rest of the way, which actuates the latch and retracts the ball bearings into their housing so the shackle can open.
If that doesn't make sense straight away, just keep reading. It'll become clear soon enough!
If you insert a blank key and rotate it, the discs will only rotate 90° and stop. This is why:
As you can see, none of the gates are aligned (actually, at least one will be... but more on that later) and the sidebar is blocking the discs from rotating past this point. Now you can see what those lips are for. Our goal is to align the gate in each disc with the sidebar so that it can drop into the channel, like so:
And free up the shearline so we can rotate the whole way:
Sounds complicated, so how do we pick it? Well, there is actually a binding order just like with any other lock. The reason these mechanisms can be picked is their necessity for "zero discs". You see, when you insert a key, at least one of those discs needs to act as a driver to keep the others in order. Without a zero disc, the gates wouldn't align at the correct position and it wouldn't open.
You don't need to worry too much about that though. All you need to know is that there is at least one of these discs in there, and it is the key to the whole picking process. The zero disc is almost always the very first disc, or the one at the back.
Here is what happens when we apply tension to a zero disc. This is the disc before rotating:
When we rotate it 90°, the gate aligns with the sidebar. The lip binds against the sidebar and prevents the disc from rotating any further. What happens now, is that the sidebar will try and enter the gate. Because of tolerance errors, just like any other lock, this causes the sidebar to bind against another disc somewhere:
So, all we do now is feel for the disc which is binding and rotate it until the gate lines up, then repeat the process until everything is aligned and the lock opens! When you apply tension to the zero disc, most of the others will feel loose and rotate freely, but the one which is binding will have a distinct dragging feeling as you rotate it. Once it loosens up, it's safe to assume that the gate is aligned and the sidebar is now binding against another disc.
TIPS & TRICKS!
- It is common practice to rotate all the discs 90° before picking. This is known as "zeroing the discs", and we do this to align all the zero cuts with the sidebar right off the bat, so there is less work to do. It's not necessary but it helps, and if you need to be tensioning a disc other than the first one, you'll find out much quicker if you zero the discs first.
- Heavy tension provides excellent feedback, but is not a good idea. If you must use heavy tension, do so only to locate binding discs and loosen up before actually rotating them. I've found with practice that the less tension you use, the better.
- Rotate discs slowly and pay attention to what you're feeling. It's a good idea to rotate them fully CCW and all the way back again because there can be zero discs in the middle of the pack.
- One disc at a time! You can't rush these locks. Haphazard twisting of the pick back and forth while moving it in and out of the lock won't get you anywhere.
- The more the lock tightens up, the closer it is to opening. You need to exercise gentle tension and careful movement with your pick as it tightens up.
- I've found that sometimes the front disc will seem to spin but there is a lot of friction and the lock won't open. The lock is almost open at this point, but if you get this kind of feedback it's a sign that you're using too much tension. Lighten it up and keep picking. When the gates are aligned everything will turn very smoothly and gently. Don't try to force it... when it's open, you'll know about it. There's no guesswork with these things.
I hope you guys enjoyed this, and anyone who wasn't sure how they worked before has had a eureka moment somewhere along the way. If my diagrams suck and make no sense, here is that animation I mentioned at the start instead.
