


![]() Wed Mar 27, 2013 3:41 am
Wed Mar 27, 2013 3:41 am
Solomon's guide to lever padlocks :D
I'm by no means an expert on these things but there's bound to be somebody out there who knows less than me, so hopefully there will be learnage afoot. We were talking lever padlocks over on lp101 last night and for some reason I decided it'd be a good idea to try and make some diagrams of a simple lever padlock mechanism in photoshop... which turned into a 4 hour ordeal. And I've written up what i know to go along with them, fuck yeah.
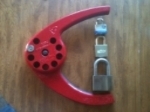
I chose the "old english" style of padlock because it's my favourite. There are different mechanisms but they all follow the same principle. If you haven't seen it already, this is a great video of one being stripped down, rebuilt and picked. Check it out!
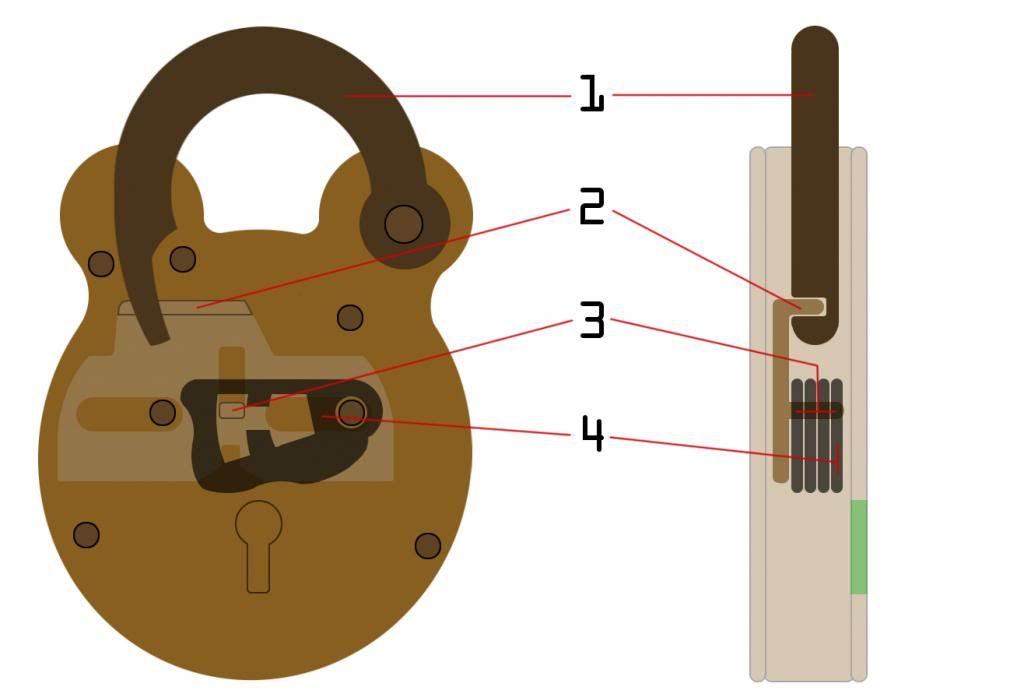
Fig. 1 - the basic parts.
1 - Shackle. When locked, this is held in place by the bolt assembly. When unlocked, it's free to flop open and shut like a shutter door on a windy day.
2 - The bolt. The bolt assembly is all one piece, and is required to slide all the way to the right to free the shackle. This part interlocks with a groove in the shackle, which you can see in the side view.
3 - The stump. When the levers are all at their correct heights, this passes through the gates. I won't be discussing false gates to keep things simple, so there aren't any in this example.
4 - The lever pack. This particular lock has 4 levers, but some will have 5 or 6. Some only have 3, and some have 7 or more.
The green section marked on the side view is the keyway. This will come in handy later for illustrating where the wires are resting.
To explain quickly, the principle of picking is the same as the pin tumbler lock but the parts are different and we use different tools. Apply tension to the bolt, feel for the binding lever, lift it until it finds the gate and the lever sets... then repeat for the other levers until the stump is free to pass through and free the shackle.
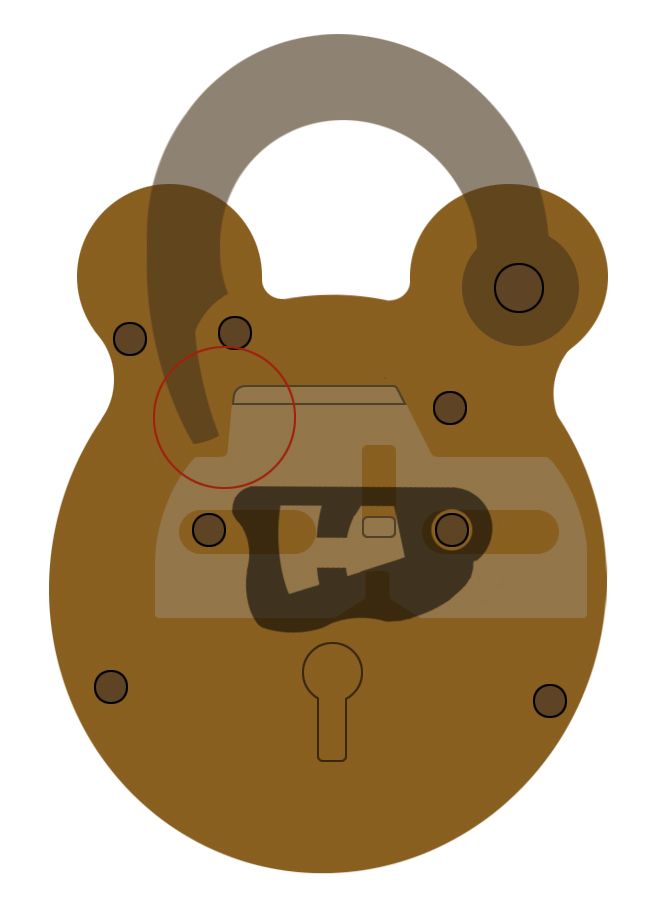
Fig. 2 - the open position. Note that the bolt is completely out of the way of the shackle (circled), so it is now free to pivot into the open position. The stump is in the other side of the lever now, and to re-lock, it must be picked again back in the opposite direction. In the case of locks with false gates, it's easier to pick back to the locked position, so whereas it isn't something to panic about, it is worth mentioning. In some padlocks (ie. chubb cruiser) you only need to pick one lever (the "drop lever") in order to re-lock. Props go to safelocks for that bit of info, I only learned that recently. If you're careful when sliding the bolt across, you can open it just enough to free the shackle without it re-locking in the open position but as I said, I wouldn't worry about it if it does happen. It's easier with some locks than others.
Fig. 3 - Shackle tension. A flat piece of steel such as a hacksaw blade is ground down to fit behind the bolt and apply pressure. We push against the blade (1), which pivots on the rivet (2) and thus pushes against the bolt (3). Circled is the stump, which will bind against one or more levers.
This only seems to work on larger padlocks, as with smaller ones it has a tendency to slip around the side of the bolt where it can't apply tension. It isn't really necessary to tension this way anyway, unless there is a post in the keyway (described later) and you want to use a modified key to pick the levers.
Fig. 4 - Front keyway tension. For this method we use a wire bent at one end, approximately 1.5x the height of the keyway. It takes a little trial and error to get the size right, but it doesn't have to be exact. If possible, you may as well have the lock in the open position to speed things up a bit. The second bend can be made to face downards, out to the right, left, or any angle you wish. Well, apart from straight up, obviously. As long as the upstand is the correct height and it leaves the keyway clear for your pick wire, you can do whatever you want with it.
Fig. 5 - rear tension. Some padlocks, most notably the Squire range (with the exception of the Valiant HSV), have a hole in the back for the tip of key to poke through. This makes for a handy place to insert a tensioner. Same idea as before, but with a shorter upstand (just about the height of the keyway). A picture says a thousand words.
Now, I mentioned locks with a post in the keyway earlier. This is pretty common so you'll want to know how to deal with it. The best option is to use shackle tension and a modified key blank (or spare key). Simply file away the beef until you have a little upstand left at the tip, a tiny bit thinner than one of the levers. It's handy to have the lock open so you can tell when you've got it just thin enough, then take a bit more off and you're done. I haven't bothered to mock up a diagram for that. Just use shackle tension as pictured, insert your modified key and turn to lift the levers. Couldn't be simpler.
It is possible to use a wire, but there are complications:
Fig. 6 - front tension with a post in the way. Same idea as in Fig. 4, but your space is limited by the post and using a straight bend might not adequately tension the bolt (if at all). Depends on the lock whether you can do this or not, but generally speaking if you put a curve in your upstand, it'll give you just enough to get it picked. Alternatively you can use a sharp bend towards the tip, like a hook pick, but with a second sharp upwards bend (see Fig. 7) but this is trickier to get the dimensions right and you don't really get that much extra clearance out of it anyway. From my experience, you'll have an easier time getting onto the bolt using an even curve and the zigzag type isn't an option if the keyway is very tight so you're better off keeping it simple.
The issue with this type of tension is that the bolt cannot be fully thrown (see Fig. 8). You can see here that the levers are all raised to their correct heights and the stump has entered the gates - however, the post is preventing the wrench from moving the bolt any further. If you remove your tools, the bolt assembly will sit in limbo like this, so you need to go in with a short wire to hook into the bolt and flick it fully across. It's not much of an issue when you get the feel for it.
OK solomon, enough about tension!! What about the levers? Yeah, I'm getting to that. Let's go back to the simple ones without the post for starters.
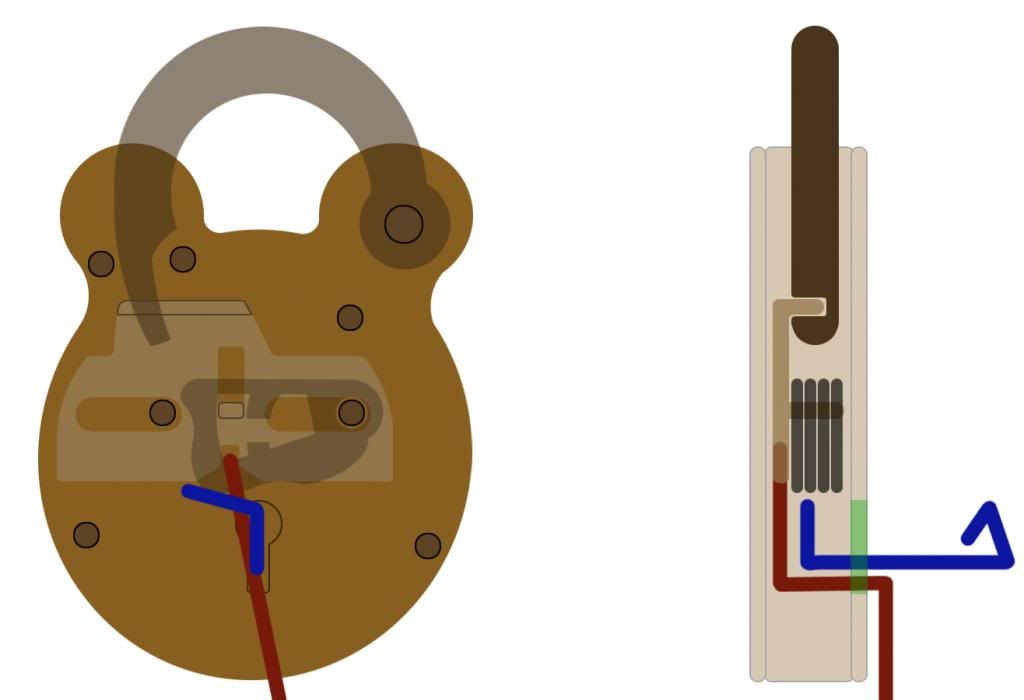
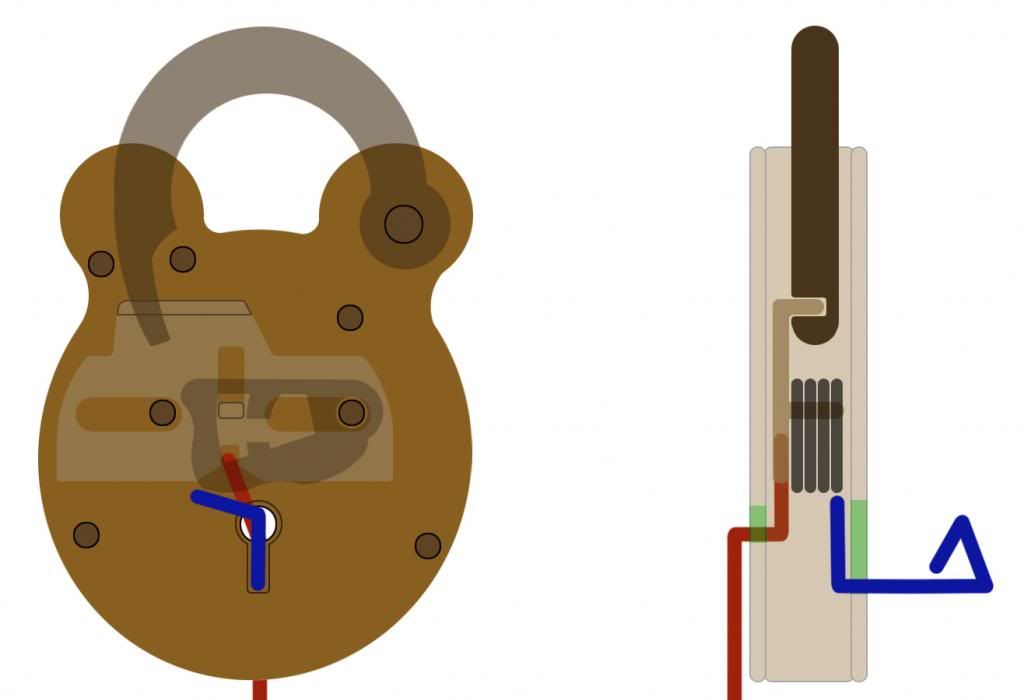
Fig. 9 - Traditional picking, all in the front. Here, the tension wire is in red and the pick wire is in blue. The pick wire I prefer to use is this style, but I encourage you to experiment and see what feels right for you. To make this style of wire, you bend an upstand at the end, 90 degrees upward, like what you can see in the side view but a good bit taller (because we will be creating a bend out to the left afterwards). I prefer to form some kind of handle before I start fuskering with the tip but that's up to you.
The second bend can be 90 degrees, but I've found it's better to have it angled up slightly like I've drawn in the front view in Fig. 8. The actual upstand before the left-hand bend should be the height of the keyway, minus the thickness of whatever wire you're using for tension. This way it can rest at the bottom of the keyway (but on top of the tension wire) and the left-hand bend sits fairly close to the levers. That way, you can simply rotate it and it lifts the levers nice and high without having to physically push upwards. The length of the left-hand bend doesn't matter providing it's not too short, but you don't want it too long either. About the height of the keyway is a decent guideline.
Fig. 10 - picking with rear hole (huhuh) tension. Same idea as before really. Not sure why I even did this one as it's pretty self-explanatory if you've been paying attention thus far, but meh. Eye candy.
UPDATE! It's occurred to me that in my sleepless state, I talked about tension wires for getting around the post but not pick wires.
For picking around a post, the best bet is to use thin gauge wire. A simple left-facing "L" bend with a handle is all you need (see Fig. 11. The trick to using this is to "balance" it on top of the post, which can be achieved by resting your index finger against the face of the padlock just beside the keyway. When the wire rotates, your finger prevents it from slipping around the right hand side of the post. Simple is best. There are ways of shaping a wire so it can rest along the bottom ofthe keyway and reach around the post, but it's tedious and unnecessary.
If you're using a pipe key as a tensioner, you simply insert your modified key and file a flat on it to let the wire over the top.
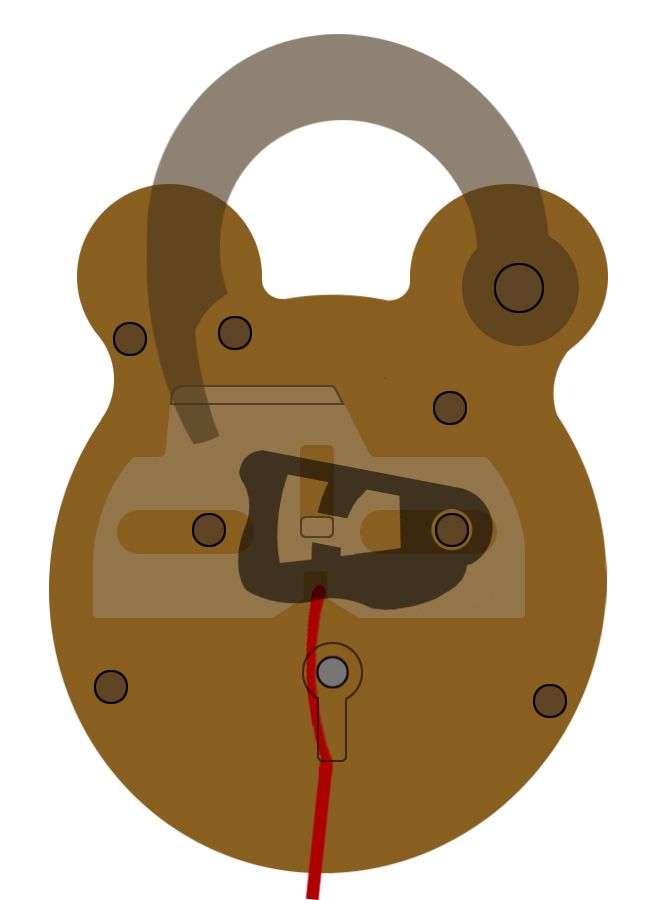
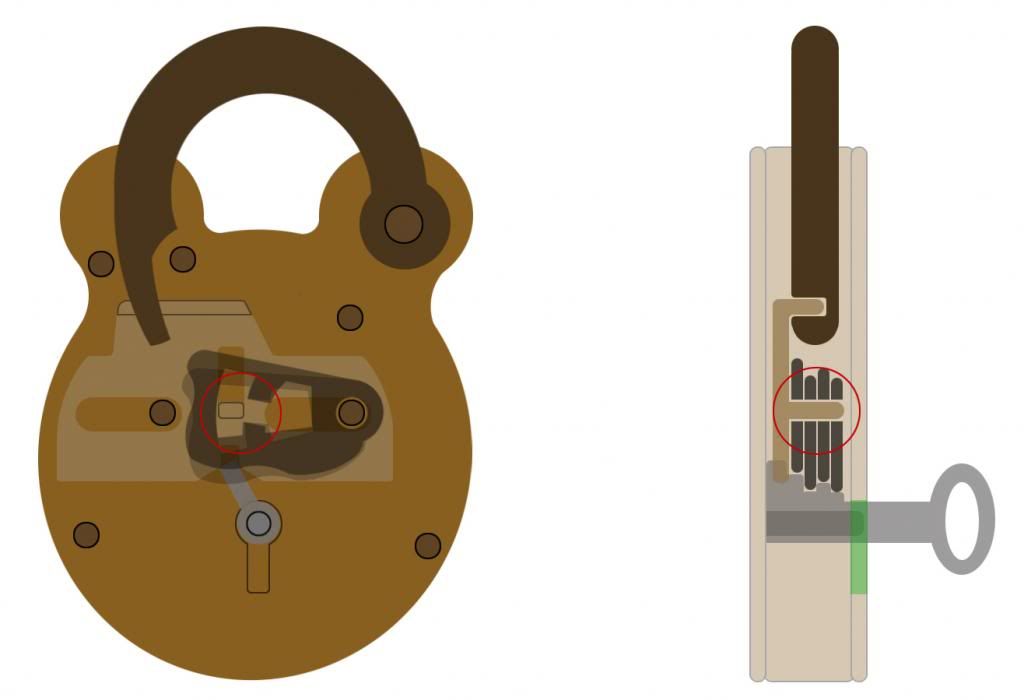
In Fig. 12 I have removed the levers from the front view so you can see how the tip of the key interacts with the bolt. The flat is represented by the red line; you can see clearly why this space needs to be freed up. This flat must be the entire length of the key. It looks as though the key bow presents a bit of an obstacle for the wire to get past, but notice on the front view you can see that the bow sits off to an angle. The wire slides nicely along the right-hand side. You can even file a little groove into the bow to stabilise it further if you wish. It's not particularly comfortable to pinch the top and bottom of the key bow for tension, but it works. And you get used to it. A great idea I saw once was to use a longer blank, and actually bend it downwards using a butane torch. This not only gives you great comfort and control, but also lets you really pile the tension on if need be. Big thanks to Daz for this idea.
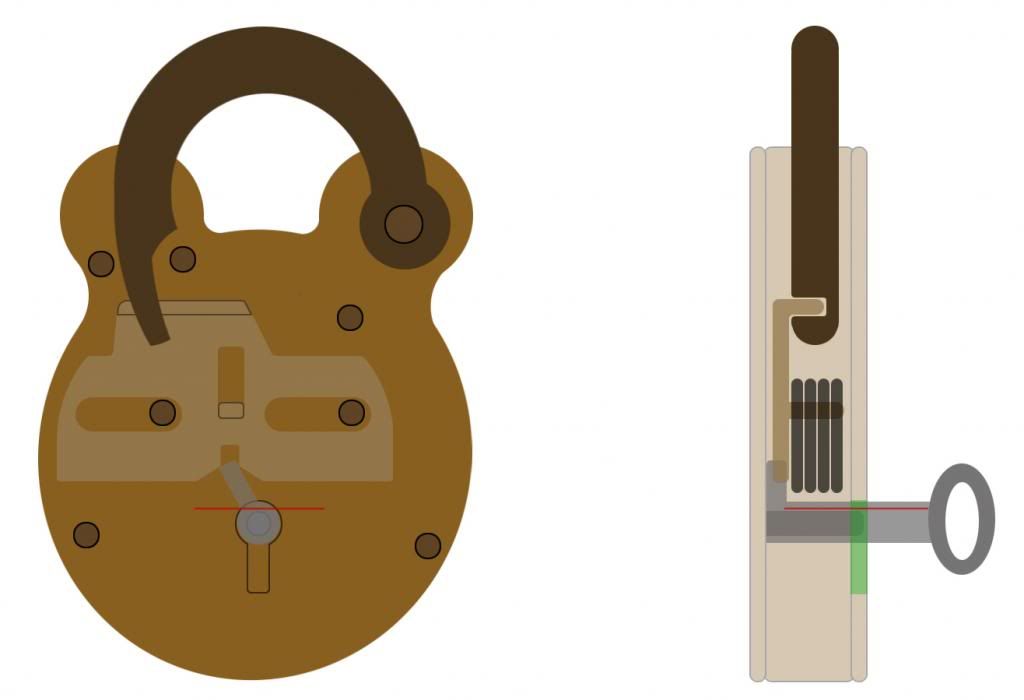
And while I was doing that diagram, I figured I'd mock up a working key for you guys too. You can see the key sitting in the notch in the bolt, the levers are all raised to their correct heights, and now further turning of the key will throw the bolt into the open position. This is probably the first thing I should've done, but better late than never right?
So there we have it! Hope you enjoyed reading, and if you learned something then great. I figured you guys would get something outta this cos you're mostly from the US and these things aren't overly common there... but apologies to anyone who learned all of this years ago and is sick and tired of seeing basic lever shit lol. Cheers everyone
I chose the "old english" style of padlock because it's my favourite. There are different mechanisms but they all follow the same principle. If you haven't seen it already, this is a great video of one being stripped down, rebuilt and picked. Check it out!
Fig. 1 - the basic parts.
1 - Shackle. When locked, this is held in place by the bolt assembly. When unlocked, it's free to flop open and shut like a shutter door on a windy day.
2 - The bolt. The bolt assembly is all one piece, and is required to slide all the way to the right to free the shackle. This part interlocks with a groove in the shackle, which you can see in the side view.
3 - The stump. When the levers are all at their correct heights, this passes through the gates. I won't be discussing false gates to keep things simple, so there aren't any in this example.
4 - The lever pack. This particular lock has 4 levers, but some will have 5 or 6. Some only have 3, and some have 7 or more.
The green section marked on the side view is the keyway. This will come in handy later for illustrating where the wires are resting.
To explain quickly, the principle of picking is the same as the pin tumbler lock but the parts are different and we use different tools. Apply tension to the bolt, feel for the binding lever, lift it until it finds the gate and the lever sets... then repeat for the other levers until the stump is free to pass through and free the shackle.
Fig. 2 - the open position. Note that the bolt is completely out of the way of the shackle (circled), so it is now free to pivot into the open position. The stump is in the other side of the lever now, and to re-lock, it must be picked again back in the opposite direction. In the case of locks with false gates, it's easier to pick back to the locked position, so whereas it isn't something to panic about, it is worth mentioning. In some padlocks (ie. chubb cruiser) you only need to pick one lever (the "drop lever") in order to re-lock. Props go to safelocks for that bit of info, I only learned that recently. If you're careful when sliding the bolt across, you can open it just enough to free the shackle without it re-locking in the open position but as I said, I wouldn't worry about it if it does happen. It's easier with some locks than others.
Fig. 3 - Shackle tension. A flat piece of steel such as a hacksaw blade is ground down to fit behind the bolt and apply pressure. We push against the blade (1), which pivots on the rivet (2) and thus pushes against the bolt (3). Circled is the stump, which will bind against one or more levers.
This only seems to work on larger padlocks, as with smaller ones it has a tendency to slip around the side of the bolt where it can't apply tension. It isn't really necessary to tension this way anyway, unless there is a post in the keyway (described later) and you want to use a modified key to pick the levers.
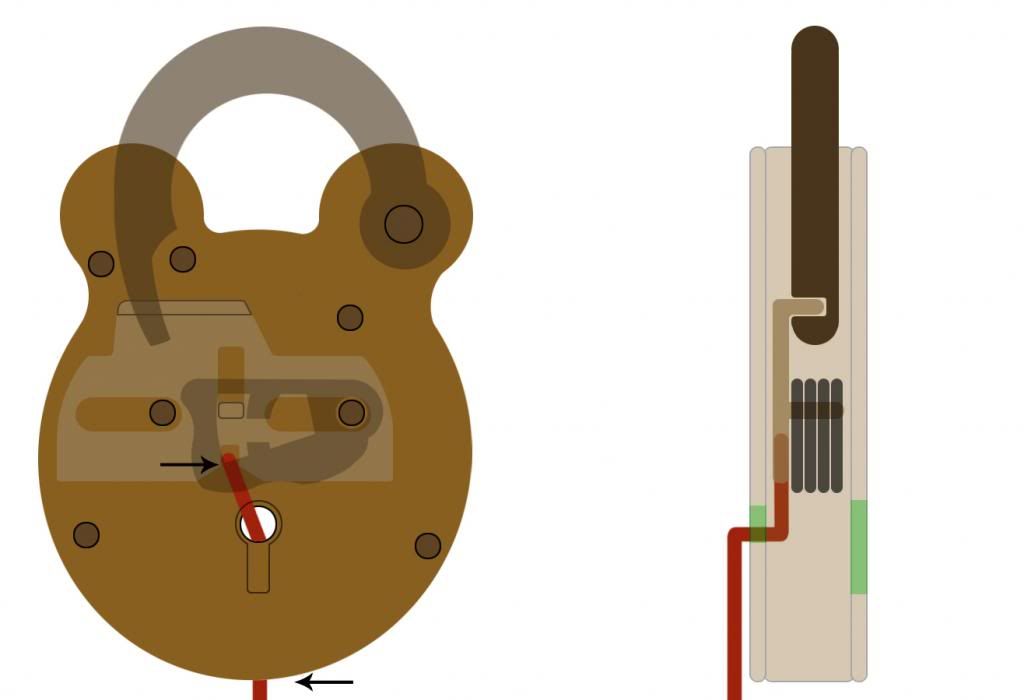
Fig. 4 - Front keyway tension. For this method we use a wire bent at one end, approximately 1.5x the height of the keyway. It takes a little trial and error to get the size right, but it doesn't have to be exact. If possible, you may as well have the lock in the open position to speed things up a bit. The second bend can be made to face downards, out to the right, left, or any angle you wish. Well, apart from straight up, obviously. As long as the upstand is the correct height and it leaves the keyway clear for your pick wire, you can do whatever you want with it.
Fig. 5 - rear tension. Some padlocks, most notably the Squire range (with the exception of the Valiant HSV), have a hole in the back for the tip of key to poke through. This makes for a handy place to insert a tensioner. Same idea as before, but with a shorter upstand (just about the height of the keyway). A picture says a thousand words.
Now, I mentioned locks with a post in the keyway earlier. This is pretty common so you'll want to know how to deal with it. The best option is to use shackle tension and a modified key blank (or spare key). Simply file away the beef until you have a little upstand left at the tip, a tiny bit thinner than one of the levers. It's handy to have the lock open so you can tell when you've got it just thin enough, then take a bit more off and you're done. I haven't bothered to mock up a diagram for that. Just use shackle tension as pictured, insert your modified key and turn to lift the levers. Couldn't be simpler.
It is possible to use a wire, but there are complications:
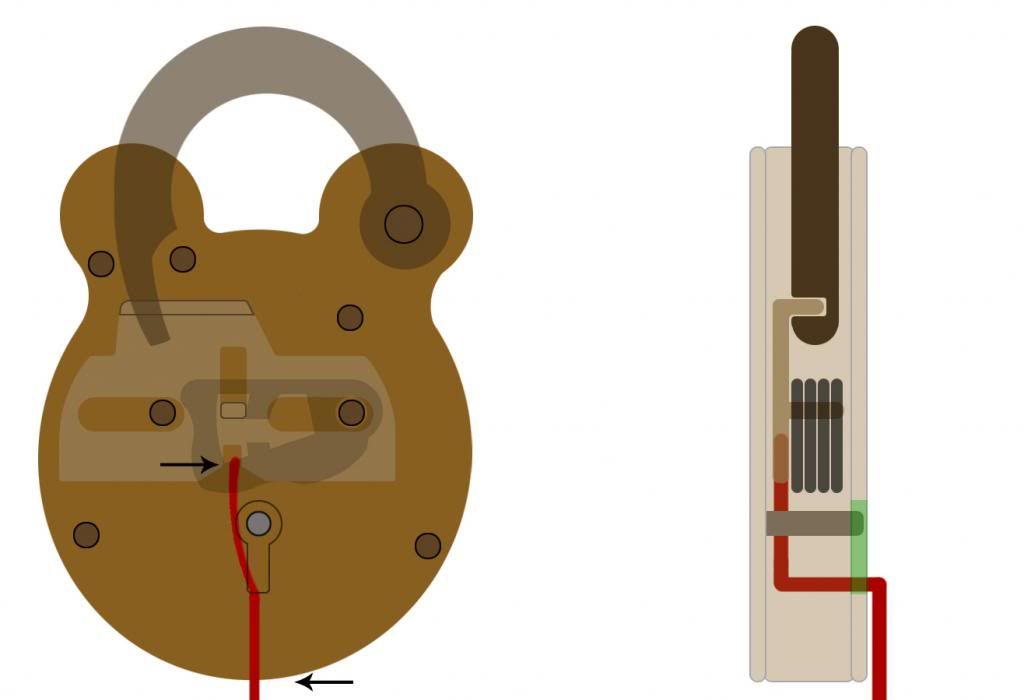
Fig. 6 - front tension with a post in the way. Same idea as in Fig. 4, but your space is limited by the post and using a straight bend might not adequately tension the bolt (if at all). Depends on the lock whether you can do this or not, but generally speaking if you put a curve in your upstand, it'll give you just enough to get it picked. Alternatively you can use a sharp bend towards the tip, like a hook pick, but with a second sharp upwards bend (see Fig. 7) but this is trickier to get the dimensions right and you don't really get that much extra clearance out of it anyway. From my experience, you'll have an easier time getting onto the bolt using an even curve and the zigzag type isn't an option if the keyway is very tight so you're better off keeping it simple.
The issue with this type of tension is that the bolt cannot be fully thrown (see Fig. 8). You can see here that the levers are all raised to their correct heights and the stump has entered the gates - however, the post is preventing the wrench from moving the bolt any further. If you remove your tools, the bolt assembly will sit in limbo like this, so you need to go in with a short wire to hook into the bolt and flick it fully across. It's not much of an issue when you get the feel for it.
OK solomon, enough about tension!! What about the levers? Yeah, I'm getting to that. Let's go back to the simple ones without the post for starters.
Fig. 9 - Traditional picking, all in the front. Here, the tension wire is in red and the pick wire is in blue. The pick wire I prefer to use is this style, but I encourage you to experiment and see what feels right for you. To make this style of wire, you bend an upstand at the end, 90 degrees upward, like what you can see in the side view but a good bit taller (because we will be creating a bend out to the left afterwards). I prefer to form some kind of handle before I start fuskering with the tip but that's up to you.
The second bend can be 90 degrees, but I've found it's better to have it angled up slightly like I've drawn in the front view in Fig. 8. The actual upstand before the left-hand bend should be the height of the keyway, minus the thickness of whatever wire you're using for tension. This way it can rest at the bottom of the keyway (but on top of the tension wire) and the left-hand bend sits fairly close to the levers. That way, you can simply rotate it and it lifts the levers nice and high without having to physically push upwards. The length of the left-hand bend doesn't matter providing it's not too short, but you don't want it too long either. About the height of the keyway is a decent guideline.
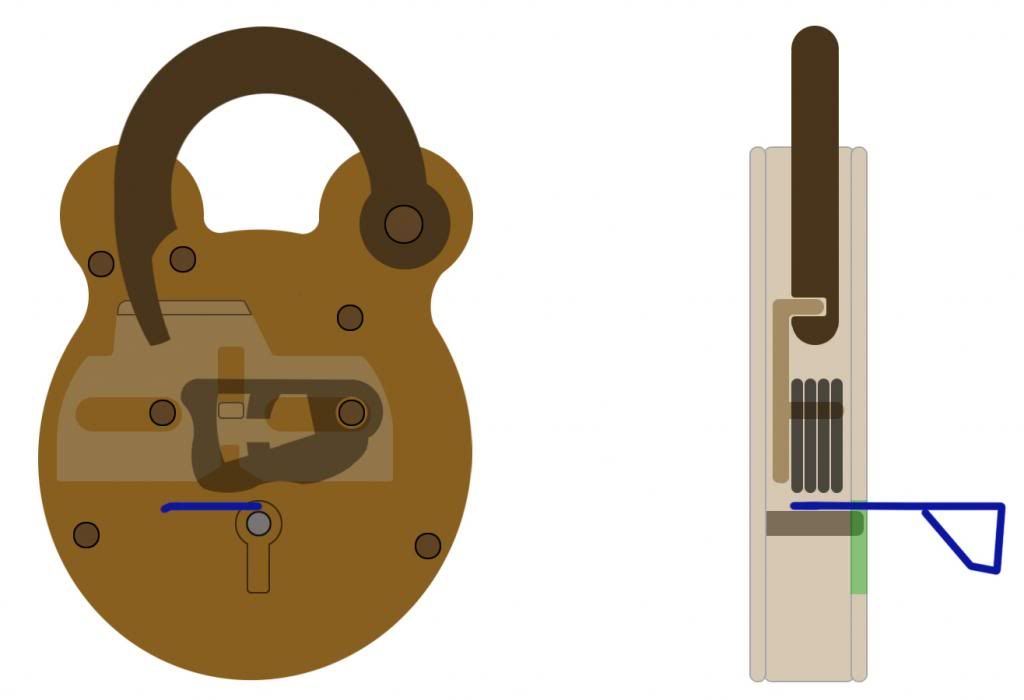
Fig. 10 - picking with rear hole (huhuh) tension. Same idea as before really. Not sure why I even did this one as it's pretty self-explanatory if you've been paying attention thus far, but meh. Eye candy.
UPDATE! It's occurred to me that in my sleepless state, I talked about tension wires for getting around the post but not pick wires.
For picking around a post, the best bet is to use thin gauge wire. A simple left-facing "L" bend with a handle is all you need (see Fig. 11. The trick to using this is to "balance" it on top of the post, which can be achieved by resting your index finger against the face of the padlock just beside the keyway. When the wire rotates, your finger prevents it from slipping around the right hand side of the post. Simple is best. There are ways of shaping a wire so it can rest along the bottom ofthe keyway and reach around the post, but it's tedious and unnecessary.
If you're using a pipe key as a tensioner, you simply insert your modified key and file a flat on it to let the wire over the top.
In Fig. 12 I have removed the levers from the front view so you can see how the tip of the key interacts with the bolt. The flat is represented by the red line; you can see clearly why this space needs to be freed up. This flat must be the entire length of the key. It looks as though the key bow presents a bit of an obstacle for the wire to get past, but notice on the front view you can see that the bow sits off to an angle. The wire slides nicely along the right-hand side. You can even file a little groove into the bow to stabilise it further if you wish. It's not particularly comfortable to pinch the top and bottom of the key bow for tension, but it works. And you get used to it. A great idea I saw once was to use a longer blank, and actually bend it downwards using a butane torch. This not only gives you great comfort and control, but also lets you really pile the tension on if need be. Big thanks to Daz for this idea.
And while I was doing that diagram, I figured I'd mock up a working key for you guys too. You can see the key sitting in the notch in the bolt, the levers are all raised to their correct heights, and now further turning of the key will throw the bolt into the open position. This is probably the first thing I should've done, but better late than never right?
So there we have it! Hope you enjoyed reading, and if you learned something then great. I figured you guys would get something outta this cos you're mostly from the US and these things aren't overly common there... but apologies to anyone who learned all of this years ago and is sick and tired of seeing basic lever shit lol. Cheers everyone
Last edited by Solomon on Wed Mar 27, 2013 5:20 pm, edited 1 time in total.


