Page 4 of 15

Re: Oldfast Impressions

PostPosted: Tue Nov 27, 2012 8:16 am
by GringoLocksmith
I'm impressed with both your keys and the photos you've taken of them. They all come out so pretty.

When I first started trying this in my shop, the other guys thought I was nuts. They watched and chuckled with satisfaction as I ruined several blanks. No one was more surprised than I was the first time that one of my battered keys actually turned the lock. The most satisfying thing is that now my co-workers are trying to develop the skill.

We do this in a poorly lit shop without magnification, and usually with nothing more than two screwdrivers and a round file. This probably contributes to my high failure rate.

Re: Oldfast Impressions

PostPosted: Tue Nov 27, 2012 9:59 am
by Oldfast
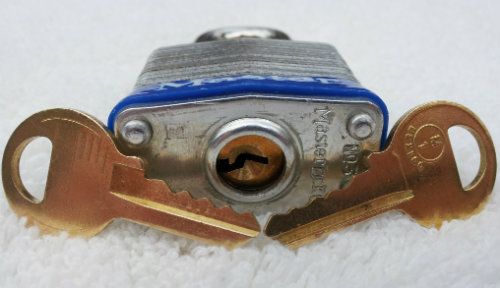
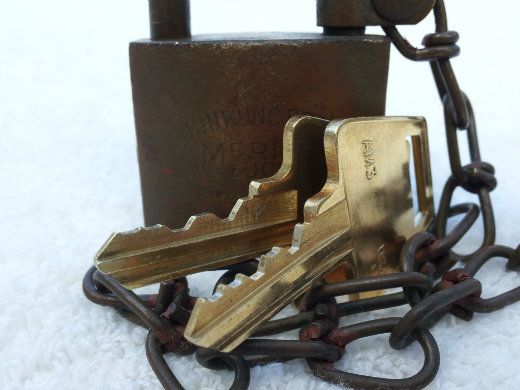
Caveman wrote:... This is my first impression. Can I post it here with you Oldfast? ...
Most certainly! Good work & enthusiasm is ALWAYS welcome on my threads :) How exciting, right?!

Caveman wrote:I made it today, and I am really happy with it. It took me almost 1 hour, during wich I almost lost the faith in myself. I know the key head looks terrible. Only the maker of this key could love it, and I do... :mrgreen:
I've gotta say... I'm impressed with both the lock and the key! That's a hell of a lock for your first impression,
and your cuts look FAR better than mine did the first time around. My first lock was a little 4-pin Master...
I had really no knowledge of impressioning, just heard of it. It didn't take me an hour... but HOUR(S). lol
I know all too well that feeling of doubt half-way in... you start wondering if you missed something along
the way... but you think, "what the hell, I'll let it play out". I still get that feeling. It actually adds to the
excitement when that key turns and you realize you didn't mess up. Thanks for sharing Caveman!

Caveman wrote:... Fine tuning the key, while you have a silly smile on your face ...
I also wanted to mention; I've got a key to a working state before....
then (in my quest for perfection) I "fine tuned" it right into not working LOL!
But yeah, there's always a little more work to be had after that key turns the first time.

GringoLocksmith wrote:I'm impressed with both your keys and the photos you've taken of them. They all come out so pretty.

When I first started trying this in my shop, the other guys thought I was nuts. They watched and chuckled with satisfaction as I ruined several blanks. No one was more surprised than I was the first time that one of my battered keys actually turned the lock. The most satisfying thing is that now my co-workers are trying to develop the skill.

We do this in a poorly lit shop without magnification, and usually with nothing more than two screwdrivers and a round file. This probably contributes to my high failure rate.

Gringo. Given the tools you have to work with, I'm always so impressed with what you can accomplish.
Your stories of how things are done there are always interesting and I've really enjoyed hearing about it.
I agree with what others have already said; I'm certain you're developing skills that will serve you VERY well
here in the states. I also think that when you get your hands on some proper tools... you're gonna work that
shit like magic!!!

Some circumstances have left me turning/jiggling the key with an allen wrench or screwdriver. Certainly
can be done... but you're right; I'm sure it draws from your chances of success. A good solid hold on the
key (and the lock) are probably two of the biggest factors in this game.

And Gordon - Thanks for the info and link. I've really not settled on a preference for magnification,
so I might go over there and take a look around. I've tried a variety (head gear, glasses, hand held),
and also different powers of magnification. I just dunno yet. I like it when I don't need it at all. lol

mastersmith wrote:Another thing that may allow folks here to use some existing skills while learning to impression. I "read" picked locks first. If you already have a lock picked, get a good light and look inside the keyway. You can actually see the pin lengths. This too is an acquired skill, but you can see a pins length relative to the pin next to it. Then you know which depths are shallow or deep. I have many times had this prevent me from following a false read while impressioning, as I already know which cuts are shallow. For this I use an otoscope, but a focusing flashlight usually works well enough. Most of us have one of those in our tool box.

Good point! I've a LONG ways to go in order to refine my sight or feel for 'reading' the pins...
but I'm sure it could be VERY advantageous. Currently, I feel my way thru the lock with a hook
after picking it to get a general picture of the hi-low bitting. But again, this gives me a very,
VERY rough sketch of the bitting. I should work on this more. I'll also try 'reading' the pins
through sight as you mentioned. Thanks

Re: Oldfast Impressions

PostPosted: Tue Nov 27, 2012 10:53 am
by rai
yIPPIE DOGPILE JUMP IN....


wHA? ITS OVER....

too late

Re: Oldfast Impressions

PostPosted: Tue Nov 27, 2012 12:05 pm
by Oldfast
Haha! Late to the party or not... I'm always eager to hear your thoughts Rai :)
I'm glad some people are chiming in. Hints & tips that come only with
experience (of which, I have little) are always helpful when starting.

Caveman; it's easy to let one get away from you. Keep a careful eye on where your marks are -
if you find one is not quite centered in the deepest part of a cut... direct your efforts towards
that side of the cut with your next couple strokes. In other words, your placing a little more
weight with your file to one side of the cut to bring it back in line under the pin. But yeah,
I'd assume simply putting lines on the key would be very helpful and probably alleviate
the possibility of this occurring altogether. Keep up the good work & keep sharing it!

Re: Oldfast Impressions

PostPosted: Tue Nov 27, 2012 3:26 pm
by GWiens2001
If I 'fine-tune' a key into not working, I stake it below where I fine-tuned it using a punch and the handle of a hammer or a center punch. Just a little bit at a time, on each side. This raises the metal a tiny bit, restoring operation. Then I use a micrometer and cut a new key to correct measurements.

I have also heard of solder used with some success for the same purpose. A little flux or rosin on the area to be raised helps to clean it and makes the solder stick better. It also is great if you can't see the impressioning marks due to the softness of the solder.

Best of luck with impressioning, folks!

Gordon

Re: Oldfast Impressions

PostPosted: Wed Dec 12, 2012 9:44 am
by rai
flux means flow in latin, but in jewelry, it usually means either boric acid or twenty mule team borax soap powder.
rosin is a flux for low melt solders for electronics.

flux does not clean metal nor is it part of the grip solder has.

solder only flow onto clean surfaces, so the surfaces have to be cleaned of finger oils and all other dirt.

when heat is applied, borax quickly melts into a liquid glass, this keeps the surface sealed from air which can oxidize metal quickly under heat, the solder will flow into the liquid borax glass, and displace it. this is probably about the surface tensions of both the liquid solder and the liquid flux. the heavier solder lifts the liquid borax glass and flows under it onto the hot and clean metal where it bonds. the borax is easily removed from the metal by dilute sulpheric acid

Re: Oldfast Impressions

PostPosted: Wed Jan 16, 2013 8:14 am
by Oldfast
More keys for Jeff :D

So the theme with these two locks was... ROUND versus PIPPIN

Image

Recall from page 1 of this thread... my first attempts at creating 'factory looking' American keys

Oldfast wrote:I've recently been trying to make American keys as you'd see them from factory.
Although these couple here turned out ok, it's rather difficult to create
the flats and angles with the files I currently have to work with.

Image
American Lock Series 5570 (5-pin) . . . . . blank: AM3

Image
American Lock Series 5300 (5-pin) . . . . . blank: AM3


Using several different files of various shapes, the process was both tedious and time consuming.
It was difficult to get the flats and angles to converge nicely while at the same time, arriving at the correct depth!
So the question here was - could I use just one file for this? It took some getting use to, but the answer is yes....

Now armed with a pippin, I'm able to achieve the same results with just as much precision and in FAR less time.
(key on the left impressioned using round file... and the other two keys cut using the knife edge of a pippin)

Image

Mind you, I'm not impressioning with the pippin. When it comes to impressioning I prefer a round file, hands down.
After creating a working key using a round file, I clamp a blank behind it using vice grips, then place the whole
assembly in the vice. This leaves me with both hands on the pippin, making it much easier to apply the side
pressure and rotation that's required in order to widen out the cut and get the sloped angles straight.

Image

The original impressioned key not pictured. Here I was duplicating one of the keys I had messed up
when I cut a little to deep on the first bitting. But you get the idea of clamping them together.
The first key provides me with the depth and spacing needed to cut a 'factory looking' key.


Image

Thanks again for playing Jeff :) They should be arriving today or tomorrow.

Re: Oldfast Impressions

PostPosted: Wed Jan 16, 2013 8:38 am
by jeffmoss26
Beautiful!! The keys look like they came from the factory...amazing.

Re: Oldfast Impressions

PostPosted: Sat Jan 19, 2013 6:10 pm
by Oldfast
Hand-cut keys for a couple of Americans... headed for Daggers

Image

As you can see, I wasn't all too kind when I chose the bitting for the green one :D
Might be just a wee bit outside of the MACS... lol... you can thank me later. lol

Nah, really though, they're no more wicked than any other American. I just picked
through both... a standard short hook handled the bitting just fine. Been awhile
since I've picked one.... fun. Remembered why they're one of my favorites.

Nice mixture of :serrated: and :spoorated: in em' for you. Hope ya enjoy!

Re: Oldfast Impressions

PostPosted: Sat Jan 19, 2013 6:19 pm
by Riyame
Damn man, you are getting really good! Those keys look amazing.

Re: Oldfast Impressions

PostPosted: Sat Jan 19, 2013 6:40 pm
by LockManipulator
Oh man, those look great! Thanks Oldfast! :D

Re: Oldfast Impressions

PostPosted: Sat Jan 19, 2013 6:45 pm
by jeffmoss26
Awesome!

Re: Oldfast Impressions

PostPosted: Sat Jan 19, 2013 7:40 pm
by piotr
Riyame wrote:Damn man, you are getting really good! Those keys look amazing.


:agree:

Re: Oldfast Impressions

PostPosted: Sat Jan 19, 2013 8:06 pm
by Oldfast
Thanks guys. One of my biggest problems is resisting the urge to 'tweak' the looks
of a key after it's functioning perfectly lol. Can mess things up sometimes. ha!

Re: Oldfast Impressions

PostPosted: Thu Jan 24, 2013 3:50 pm
by LockManipulator
I just received the locks that were sent to me and the keys work really smooth! I've used factory cut keys that aren't as smooth as these